1 XGBoost基础应用
导入需要用的库
import numpy as np
import pandas as pd
import matplotlib.pyplot as plt
import os

import xgboost as xgb
from xgboost import XGBClassifier
from xgboost import cv # 交叉验证
from sklearn.model_selection import train_test_split
from sklearn.metrics import accuracy_score导入数据,数据下载地址Wholesale customers data.csv
data = './Wholesale customers data.csv'

df = pd.read_csv(data)看一下数据集,$Channel$是要预测的target,里面只包含1和2两个类别
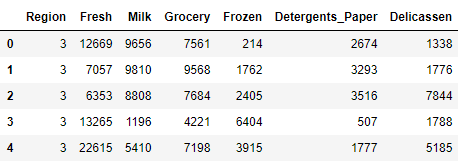
df.shape(440, 8)df.head()
df.info()<class 'pandas.core.frame.DataFrame'>
RangeIndex: 440 entries, 0 to 439
Data columns (total 8 columns):
# Column Non-Null Count Dtype
--- ------ -------------- -----
0 Channel 440 non-null int64
1 Region 440 non-null int64
2 Fresh 440 non-null int64
3 Milk 440 non-null int64
4 Grocery 440 non-null int64
5 Frozen 440 non-null int64
6 Detergents_Paper 440 non-null int64
7 Delicassen 440 non-null int64
dtypes: int64(8)
memory usage: 27.6 KBdf.describe()
df.isnull().sum()Channel 0
Region 0
Fresh 0
Milk 0
Grocery 0
Frozen 0
Detergents_Paper 0
Delicassen 0
dtype: int64分离feature和target
X = df.drop('Channel', axis=1)
y = df['Channel']
X.head()
y.head()0 2
1 2
2 2
3 1
4 2
Name: Channel, dtype: int64转换target为{0,1}
y[y == 2] = 0构建DMatrix数据集,这样可以加速XGBoost计算
data_dmatrix = xgb.DMatrix(data=X,label=y)当然也可以使用numpy.array/pandas.DataFrame作为输入,下面试一下不适用DMatrix来做训练
X_train, X_test, y_train, y_test = train_test_split(X, y, test_size = 0.3, random_state = 0)params = {
'objective':'binary:logistic',
'max_depth': 4,
'alpha': 10,
'learning_rate': 1.0,
'n_estimators':100
}
xgb_clf = XGBClassifier(**params, use_label_encoder=False)
xgb_clf.fit(X_train, y_train)XGBClassifier(alpha=10, base_score=0.5, booster='gbtree', colsample_bylevel=1,
colsample_bynode=1, colsample_bytree=1, gamma=0, gpu_id=-1,
importance_type='gain', interaction_constraints='',
learning_rate=1.0, max_delta_step=0, max_depth=4,
min_child_weight=1, missing=nan, monotone_constraints='()',
n_estimators=100, n_jobs=8, num_parallel_tree=1, random_state=0,
reg_alpha=10, reg_lambda=1, scale_pos_weight=1, subsample=1,
tree_method='exact', use_label_encoder=False,
validate_parameters=1, verbosity=None)y_pred = xgb_clf.predict(X_test)print('XGBoost model accuracy score: {0:0.4f}'. format(accuracy_score(y_test, y_pred)))XGBoost model accuracy score: 0.8864试一下使用DMatrix,同时为了方便,也可以使用xgboost.cv来做交叉验证
params = {"objective":"binary:logistic",'colsample_bytree': 0.3,'learning_rate': 0.1,
                'max_depth': 5, 'alpha': 10}

xgb_cv = cv(dtrain=data_dmatrix, params=params, nfold=3,
                    num_boost_round=50, early_stopping_rounds=10, metrics="auc", as_pandas=True, seed=123)
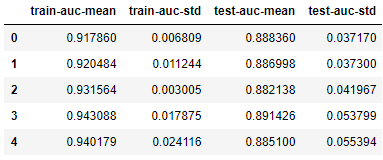
交叉验证矩阵
xgb_cv.head()
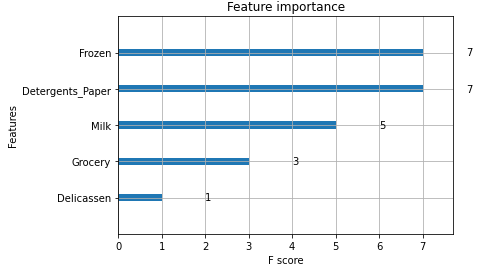
xgb.plot_importance(xgb_clf)
plt.figure(figsize = (16, 12))
plt.show()
2 XGBoost调参
XGBoost参数一般分为以下4类
- 一般参数
- booster参数
- 学习任务参数
- 命令行参数(只有命令行运行时才需要设置)
2.1 一般参数
2.1.1 booster
booster[default = gbtree]
- booster参数决定使用的底层模型是什么
- 共3中选项:gbtree, gblinear or dart.
- gbtree / dart - 使用基于树的模型
- gblinear 使用线性模型
2.1.2 verbosity
verbosity[default = 1]
- log的显示力度
- 包括: 0 (silent), 1 (warning), 2 (info), 3 (debug).
2.1.3 nthread
nthread [default = 最大线程数]
- XGBoost使用的线程数
- 如果希望使用全部线程,那么不设置就OK了,算法会自动检测
还有一些其他参数,不需要专门设置,例如:
- disable_default_eval_metric [default=0]
- num_pbuffer [算法自动设置]
- num_feature [算法自动检测]
2.2 Booster 参数
XGBoost有两种booster,分别是:tree booster and linear booster,这篇文章只讨论tree booster,更细节的参数内容可以在 Parameters for Tree Booster查看。
2.2.1 eta
eta [default=0.3, alias: learning_rate]
- 类似于GBM里面的学习率
- 可以设置的range : [0,1]
- 常用的设置 : 0.01-0.2.
2.2.2 gamma
gamma [default=0, alias: min_split_loss]
- 预剪枝的设定,必须分裂后loss的减少程度大于gamma,才可以继续分裂
- 也就是说,gamma越大则越保守
- 可以设置的range: $[0,+\infty]$
2.2.3 max_depth
max_depth [default=6]
- 预剪枝的设定,决定了每棵树的最大深度,避免过拟合
- 树的深度越大,用到的内存越多,也越容易过拟合
- 只有
tree_method被设置为hist,使用的生长策略是基于loss的,才可以将max_depth设置为0,这代表对树的深度没有限制 max_depth可以放在交叉验证调参里面- 常用的值:3-10
2.2.4 min_child_weight
min_child_weight [default=1]
- 预剪枝的设定,如果分类后叶子节点上的权重和小于min_child_weight,则停止分裂
- 其主要目的是避免overfit,但如果设置的过高,有可能导致underfit
min_child_weight可以放在交叉验证调参里面- 可用range: $[0,\infty]$
2.2.5 max_delta_step
- max_delta_step [default=0]
- 每棵树权重改变的最大步长。如果为0,则意味着没有约束。如果它被赋予了某个正值,那么会让更新更加保守
- 一般不需要设置这个参数,但如果在logistic regression里面,样本严重不平衡时可以使用
- 可以设置为1-10
- 可用range$[0,\infty]$
2.2.6 subsample
subsample [default=1]
- 行采样,无放回。训练每棵树时会做一次行采样,避免每棵树用同样的训练集训练,差异性太小,导致过拟合
- 例如设置为0.5,那么每棵树会抽样50%的样本做训练
- 每训练一棵树,都会做一次采样
- 比例越小,过拟合的可能性越低,但太小了可能会欠拟合
- 常用值: 0.5-1
- 可用range: $(0,1]$
2.2.7 colsample_bytree, colsample_bylevel, colsample_bynode
colsample_bytree, colsample_bylevel, colsample_bynode [default=1]
- 上面这3个参数都是列采样的设定
- 所有参数的range都是 (0, 1], 且默认值为1,代表列采样的百分比
- colsample_bytree 每建立一棵树时的列采样比例
- colsample_bylevel 是每次树分裂到一个新的深度时的列采样比例,是在当前的树的特征里抽样(就是bytree->bylevel)
- colsample_bynode 是每个节点,是在当前level的特征子集里再抽取(就是bytree->bylevel->bynode)
- 假设,一共64个特征,而参数设定为 {'colsample_bytree':0.5, 'colsample_bylevel':0.5, 'colsample_bynode':0.5} 那么每个节点只有8个feature($64 \times 0.5 \times 0.5 \times 0.5$)
2.2.8 lambda
lambda [default=1, alias: reg_lambda]
- L2正则的权重,避免过拟合
2.2.9 alpha
alpha [default=0, alias: reg_alpha]
- 对L1 正则的权重,避免过拟合,当feature维度非常高的时候,增加alpha会提升计算速度
2.2.10 tree_method
tree_method string [default= auto]
- 树的生成算法
- 支持'exact',
approx,hist和 用于分布式训练的gpu_hist,而approx和gpu_hist支持外部存储器 选择:
auto,exact,approx,hist,gpu_histauto: 启发式选择最快的方法
- 对于中小型数据集,使用 exact greedy (exact)
- 对于非常大的数据集,使用approximate algorithm (approx)
- 因为老版本的XGBoost通常使用
exact,所以当自动选择了approx会收到提示
- exact: Exact greedy algorithm.遍历每个特征,在每个特征中选择该特征下的每个值作为其分裂点,计算增益损失。当遍历完所有特征之后,增益损失最大的特征值将作为其分裂点
- approx: Approximate greedy algorithm. 使用百分位数分割
- hist: Fast histogram optimized approximate greedy algorithm. 优化的
approx算法 - gpu_hist: GPU优化的
hist算法
2.2.11 scale_pos_weight
scale_pos_weight [default=1]
- 正负样本损失函数的比例,用来解决样本不平衡
- 设置为
sum(negative instances) / sum(positive instances).
2.2.12 max_leaves
max_leaves [default=0]
- 一棵树最多能有的节点数量
- 只有
grow_policy=lossguide时才可以使用
2.2.13 grow_policy
grow_policy[default=depthwise]- 决定如何分割节点
- 目前只有
tree_method是hist或者gpu_hist才支持. 可选项:
depthwise,lossguidedepthwise: 分割离root最近的节点lossguide: 分割loss降低最多的节点
还有一些其他的超参数,比如sketch_eps,updater, refresh_leaf, process_type, , max_bin, predictor and num_parallel_tree.
2.3 Learning Task 参数
- 这些参数用来定义每一步计算优化目标的衡量指标的方法
- 指定学习任务和学习目标,选项包括:
2.3.1 objective
- objective [default=reg:squarederror]
定义损失函数,常用的损失函数包括:
- reg:squarederror : 平方和损失,用于回归
- reg:squaredlogerror: 对数平方和损失,用于回归$\frac12[log(pred+1)−log(label+1)]^2$输入的label必须大于-1.
- reg:logistic : 逻辑斯蒂回归损失
- binary:logistic : 二元逻辑斯蒂回归损失,输出是概率
- binary:logitraw: 二元分类的逻辑回归,在逻辑变换($\frac{1}{1+e^{-x}}$)前的输出score
- binary:hinge : 二元分类hinge loss,只预测0或1
- multi:softmax : 多目标分类softmax,还需要设置
num-class - multi:softprob : 和softmax类似,但输出$n_{data}\times n_{class}$向量,也可以被reshape成矩阵,说明了每个样本在每个类别上的概率
2.3.2 eval_metric
- eval_metric [default有objective决定]
- 用于validation data,在回归时是
rmse,分类时是error,ranking时是map - 可以使用多个evaluation metrics
- Python调用必须用一个参数对的list传输,不能用map
最常用的选项
- rmse : root mean square error
- mae : mean absolute error
- logloss : negative log-likelihood
- error : 二元分类error rate(阈值为0.5),计算方式为
#(wrong cases)/#(all cases). 预测时,大于0.5被归于正样本,否则为负样本 - merror : 多类别分类计算方式为
#(wrong cases)/#(all cases). - mlogloss : Multiclass logloss
- auc: Area under the curve
- aucpr : Area under the PR curve
2.3.3 seed
seed [default=0]
- 随机种子,用来保证模型的reproducible